TL;DR - I show off my homelab and all its glory.
Tragic Backstory
I have always liked technology. More specifically I always liked the video games that technology let me play.

However as my goals, skillset, and lifestyle have changed over the years, so too have my needs for the right technology. I started shifting away from needing powerful computers for rendering graphics and into needing powerful computers for simulations and analyses.
A few years ago I was looking for a powerful laptop that would allow me to work on my analysis projects, support my Twitch streaming hobby, and allow me to play games (the inner child is still in there somewhere). I invested a lot of money into a brand new Dell laptop and after just two years of using it the thing began to break down. The fact that I couldn't easily upgrade or repair the laptop didn't sit right with me. I wasn't happy about just how anti-tinker a lot of modern laptops are (i.e having RAM soldered into the motherboard, difficult screen replacements, don't get me started on dongles and lack of HDMI ports, etc.). Add to that the horror that is the new windows 11 OS which hijacks my computer and essentially forces internet connectivity where it isn't necessary. I was ready for a change.
That change came in the form of a ThinkPad laptop addiction. Thinkpad laptops have a solid reputation for being upgradable, repairable, and customizable. They are machines that the user can take full control of and they don't mind if you crack a screen or can't afford 128 GB of RAM right now. Repairs can be very affordable and the components are easy to access which allows for easier upgrades. Additionally you can find used ThinkPads on Ebay for a steal. I found a used T480 laptop for $160 on Ebay, upgraded the RAM, replaced the internal battery, upgraded the removabale battery, and upgraded the wifi card for a total cost of ~$380 (including the laptop itself). I like to name my devices and called this one Elvis based on the fact that the last 4 characters of the product number (20L50018US) is leet-speak for L-BUS (Elvis).

Since Elvis is a programming-focused laptop I also knew I needed to try out a new OS. I can only use Windows Subsystem for Linux for so long before I become a threat to my computer and the computers around me. I started looking into different Linux distributions that could bring Elvis to their full potential. I had tried installing Linux before in High School but was nervous about blowing up my equipment so I decided to revert back to windows before I broke too many components on the family computer. Now that I had my own project laptop (as well as more general coding knowledge and the willingness to navigate a new OS) I was more than happy to see what damage I could do with a Linux installation. Of course I had a go big or go home mentality which is why I initially installed ArchLinux:

This was a fun learning experience, and with the installation of hyprland I found workspace management to be an essential component of the machine I was using. It felt like I could turn one screen into multiple different screens / alt-tab between different components of my work in such an intuitive way. However after daily driving the ArchLinux machine for a few weeks (and crashing and breaking all different kinds of components) I wanted something more stable for building out my projects. After checking out a couple of other Linux distributions, I narrowed in on the no-nonsense, beginner-friendly Linux Mint distribution. Linux Mint has worked wonders for healing my perception of what it is like to use a laptop for programming (and has a built-in workspace manager!). I loved the new setup so much that I bought my mom her own Linux Mint ThinkPad. It starts up much faster and cleaner than Windows systems that are often filled with bloat and unnecessary offline sign-in requirements. She loves it and finds it incredibly intuitive to use.

Great! Now I have an affordable and customizable machine that I can use to support my different coding projects. If the machine gets lost, stolen, or damaged then the whole setup can be easily replaced for an affordable price. Of course getting into this technology only increased my interest in seeing what else could be fun to tinker with...
What is a Homelab
Let's think about the current setup we have with just Elvis. Elvis is a portable, affordable, upgradable, and repairable system that is great for daily coding tasks. So what are its limitations? Its current limitations are that:
- It isn't very powerful. Great for day to day tasks but not so much for heavy-duty analyses,
- The storage space is limited (512 GB which I should have upgraded but ended up skipping it in the name of budget-friendliness) and storage of crucial data isn't necessarily safe in the event of computer damage, and
- I can't just leave it on all the time to run my scripts in the background.
For production environments / businesses that want to scale their web applications the immediate solution to these limitations is to use the cloud. Cloud service providers like Amazon Web Services (AWS), Google Cloud Platform (GCP), and Microsoft Azure offer users access to their network of computers that can be accessed from anywhere in the world. These services are relatively affordable at the beginning, however the bill can rack up fast and once you have a system that is up and running. Additionally, after the user chooses to run on one platform it can become a herculean effort to switch platforms. For serious, production-level systems this is an unavoidable consequence of working in technology. However for hobbyists that just want access to more powerful machines and additional storage, there is an alternative option: the homelab.
A homelab is your own personal cloud.
There are plenty of free, open-source software solutions that allow you integrate any old laptop, spare hard drive, or microelectronic device into a new component of your cloud. Your equipment can be as expensive or as budget-friendly as you would like it to be. Much like Elvis the ThinkPad, it can be expanded and upgraded as the needs of your system grow and change. The best part is that unlike the cloud where you rent the server equipment from one of the major providers, a homelab allows you to really own the equipment that runs your code.

An Overview of My Homelab
Homelabs are as unique as the techies who build them. For my specific hobby projects I wanted to be able to do three things:
- Run continuous scripts (running locally hosted apps, collecting data from APIs, etc.),
- Have the compute on hand for more advanced machine learning or deeplearning projects, and
- Have lots of storage.
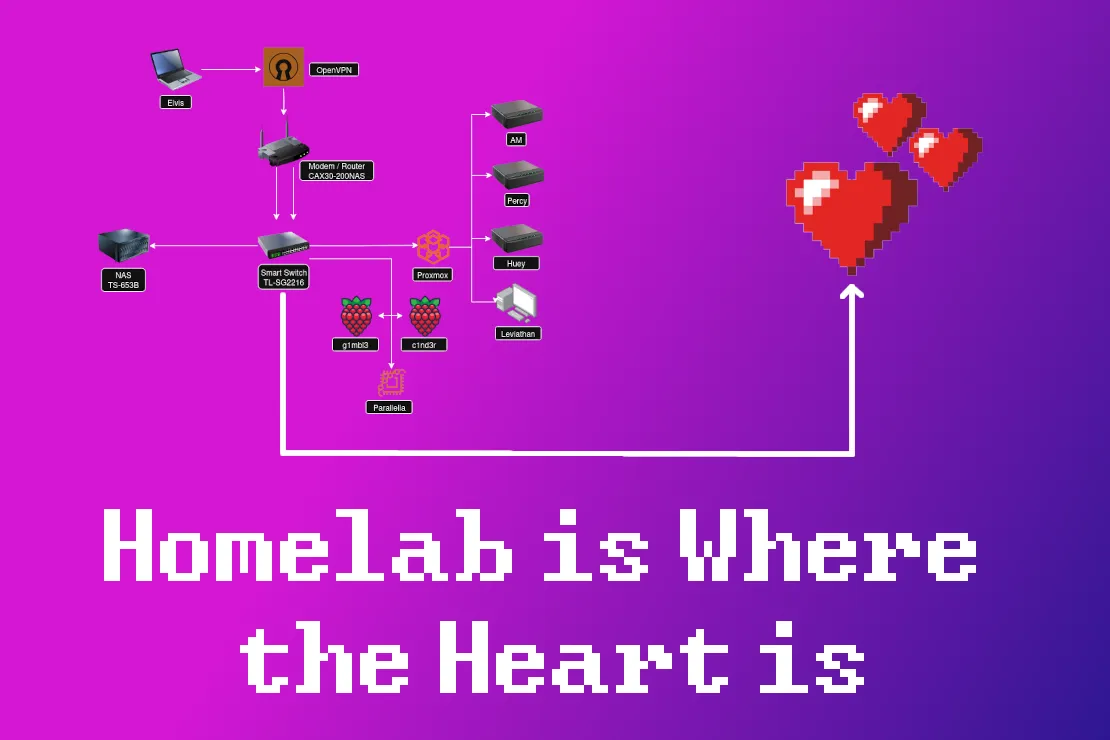
At the simplest level, this requirement can be met with a modem / router, a few hard drives, an old laptop, and an ethernet cable. Of course I like to over-complicate things so I eventually developed this system into the one pictured below:
.jpg)
A detailed diagram of my homelab is outlined below:

At the top we can see our client (accessible by Elvis or whoever else we choose to allow access to our homelab via a VPN), which connects to our network via the CAX30 Modem/Router combo. The CAX30 then connects to our smart switch which acts like the central hub for our network that allows for communication between all of our different machines. Each of these different machines play a role in mitigating the single-machine limitations I discussed earlier.
Hello Internet!

The first step in building our homelab is establishing our connection to the internet. This is done through a modem, which takes a cable or fiber connection and translates it into a system that allows our computers at home to contact other computers connected to the internet. Then, the router allows us to extend that connection to a wireless signal and connect additional components via ethernet to other computers within our network, etc. I decided to purchase the CAX30 Nighthawk modem / router combo (specifically a used version of the CAX30) because it is performant, has an easily accessible UI, and allows for flexible network settings.
Hello Intranet!

Connection to the internet is where the journey ends for most people, but we press on to developing our own intranet. The intranet is a private network that supports communication between the devices connected internally to our modem / router. This is facilitated by the use of a switch, which is a piece of equipment that allows a physical connection between many different devices in our homelab (like a large ethernet cable hub). This makes all devices visible to the router without overwhelming the wireless network. The switch also acts as an important security component of a given network, as it can allow or revoke access between different machines through the use of VLANs (Virtual Local Area Networks). Switches can get fairly expensive as your needs for network speed increase but I found a great deal on the TL-SG2216 smart switch so I went with that one.
All of the devices in my network are physically connected to one another via the switch and a few cat 5e ethernet cables.

Adding some labels is a nice way to keep track of which cable is attached to which device. Cable management can quickly become a headache if you're not careful.

We can use the UI provided by the NightHawk router to see some of our devices within our network:

One of the primary advantages of establishing this physical connection through the switch is dramatically faster information transfer between local machines. Below we can see the difference in ping (sending packets of information to, then receiving them from a destination) between out internet connection to the nearest Google server and between two machines in our network. The ping between my homelab and Google averages at 18.534 ms while the ping between two devices connected via the switch maintains an average ping of 0.570 ms (over ~30x faster rate of communication).

Another interesting quirk of having a switch is that it allows for link aggregation. Some devices in my network have multiple ethernet ports. While these different ethernet ports could be used to connect to different devices, Link aggregation (LAG) allows them to plug into the same device (the switch) and split the communication load between multiple different connections. This allows for even faster file transfer between the different nodes in our network and is a feature offered directly through the Nighthawk router.

Highly Available Compute
So what exactly are these devices that are communicating with each other in my homelab? These two devices belong to my compute cluster. My compute cluster consists of a collection of different microelectronic devices, mini PCs, and a desktop PC connected to my network that can handle any tasks I throw at them.

I can access all of these devices remotely via SSH and can apply them to any number of problems (large-scale computing jobs, long-term analyses, locally hosted websites, long-term collection of data from APIs, web-scraping, etc.). There are two subcategories of computer within this cluster. The first includes a collection of microelectronics (raspberry pis and a parallella) which are useful for prototyping scripts and IoT projects (such as the LED Pixel Matrix):

The second (bulkier) category is my proxmox cluster of computers (including mini PCs and a powerful desktop) which I use for more serious projects.

Proxmox is one of the coolest pieces of software I have ever installed on a machine. It is installed as an operating system and can be used to turn your machine into a wildcard of other operating systems. Once proxmox is installed on your machine you can use that same machine to create a sub-system of Linux Mint, Windows 98, Hannah Montana Linux, or whatever other operating system you may desire all at the same time! This means that the same computer can be used to act like many different computers at the same time (a concept known as virtualization). Proxmox is completely free, open-source, and supports constructing as many LXC containers and KVM virtual machines as a machine's resources can handle. It also provides a locally hosted UI platform which makes it easy to manage resources across many different machines as if they were one big computer. Below we can see the combined resources of my proxmox cluster:

We can also look at the individual machines within our cluster using the panel on the left. Each machine may host its own collection of virtual machines. For instance AM (what I would consider the core node of my proxmox cluster) has a few virtual machines available which include one dedicated to Portainer (currently enabled), one for a windows 10 operating system (disabled), and another for the Linux Mint operating system (disabled).

If I wanted to use AM as the host to run a windows 10 machine I can just right click on that VM and select Start to boot up that system. Below we can see the resources that this windows sub-machine (with 8 CPUs and 8 GB of RAM) is consuming:

In our console we can see our full windows desktop:

This web UI can be kind of slow and clunky. However if you're on the local network and you have another weaker windows laptop, you can even remote desktop (RDP) into this virtual machine and use it in a pretty seamless experience. The resources of the more powerful machine can then be used by the weaker laptop, allowing you to do things like program more complicated scripts and even in some cases play games. Of course this was a lot of work just to get us back to a Windows OS but the option is there if we ever need our little windows virtual hug box.
Not only does Proxmox help us consolidate all of our system resources under one coherent UI, it also helps us manage all of the different nodes in our cluster. One of the most useful features of Proxmox is its built-in Wake on LAN (WoL) feature. With a little bit of setup on each device, we can allow them to be powered back on via packets sent from online devices within proxmox cluster. For instance we can shut down one of the nodes in our network, Huey:

We can see that Huey is now offline in the overall dashboard:

Then we can decide to use another machine in the cluster to send a "wake up" packet to Huey to get them back up and running again. All we do is right click on proxmox-huey on the side panel and request a WoL packet to be sent that way to power on the machine:


This brings Huey back online:

This makes it incredibly easy to remotely manage my homelab, turning certain hardware resources on or off as needed.
The advantage of this system is that you can install proxmox on just about any old machine (an old laptop, a PC you no longer use, etc.) and convert it from an expensive paperweight into something that can help host scripts in its spare time. This army of misfit PCs can then be managed as nodes within your proxmox cluster.
One final note is that the UI is nice and intuitive, but the individual nodes (and the virtual machines that they create) can both be accessed via a direct SSH connection. This looks as easy as:

which allows you to access this machine and its resources directly from your client's terminal:

Heavy-Duty Compute
That brings me to the stars of the show in this Proxmox cluster, AM and Leviathan.

AM is a mini PC I picked up specifically because I wanted a small but powerful core node to support my homelab operations. It is a Minisforum MS-01 mini PC (available here) which consists of 20 12th gen CPU cores and 96 GB of ram. AM is an efficient node that can handle anything I throw at it and will run forever until the end of time without issues (hopefully).

This thing is a workhorse with a current uptime of about ~153 days. I use it to host my most critical long-term apps. As a mini PC, AM strikes an excellent balance between energy efficiency, stability, and compute. This helps me create a stable foundation for my proxmox cluster but isn't necessarily the best option when I need a lot of power for a specific analysis.
When I want to bring in some computationally heavy tasks I activate Leviathan. Leviathan is a gaming PC I got a great deal on (thanks Facebook marketplace!) that is equipped with a 24 core CPU, 64 GB of RAM, and a powerful RTX 3090 graphics card. While it was originally built for video games, I knew that the graphics card alone would be a valuable addition to my homelab.

The primary virtual machine that Leviathan supports is ubuntu-ml, an ubuntu server that has direct access to the GPU for training and evaluating deeplearning models.

Matrix multiplication is at the core of deeplearning architectures. A small test script was created to compare the performance of 100 pytorch matrix multiplications of two 4096 x 4090 matrices both with and without the use of the GPU. The results (shown below) demonstrate that the presence of the graphics card allows matrix multiplications to be carried out roughly ~44 times faster than without it. This translates to much faster training of deeplearning models.

The primary downside of Leviathan is that it can take a lot of power to run. At idle it consumes about 80 watts of power (which is about as much as 2/3rds of the entire homelab). Therefore Leviathan is only activated when I have actual compute-intensive tasks that I want to run (or if I want to show it off for a blog post). Otherwise I keep it turned off to help save my energy bill (and the planet or whatever).
Heavy-Duty Storage
Talk is cheap but storage is cheaper. Over the past decade I've watched as the price of a 1 tb hard drive falls further and further, meaning that storing large files has become incredibly cost effective. This is where our Network Attached Storage or NAS (affectionately named MsNASty) integrates into the system.

A NAS is essentially a homelab's database. It can take a collection of hard drives and use them as one coherent storage medium for the entire network. In my homelab I use a QNAP TS-653B NAS (specs visible here, bought used on Ebay) which makes monitoring and maintaining harddrives easy. There are more open-source solutions than using a QNAP NAS if you're interested in DIY NAS tech, but if you are looking for a plug-and-play option that acts like Google Drive out of the box then this is a great option.
This NAS is equipped with six 8 TB IronWolf HDDs that I picked up used on Ebay. The seller of the NAS also left me two free SSDs which I use for caching (faster file transfer for active files which are later moved to HDDs for cold storage). We can see all of the equipment laid out here in the Storage and Snapshots configuration of the QNAP NAS UI:

Additionally there is a lot of cool data associated with each HDDs' health which I think could be interesting to save and track over time:

In a perfect world, our six 8 TB HDDs would allow us access to 48 TB of storage. Unfortunately this world isn't perfect. We don't exactly want to treat each of these HDDs as individual storage units. If we stored information on HDD 1 like a USB drive and HDD 1 failed for whatever reason, all of that data would be lost forever. That wouldn't be ideal for our homelab system. Therefore we can take these HDDs and apply what is known as a Redundant Array of Independent Disks (RAID) 5 configuration to improve data security. This RAID 5 configuration sacrifices the storage of one disk so that if any individual disk fails it can be replaced without compromising the data stored on the overall system. It essentially turns our six HDDs into one 40 TB HDD whose parts can be easily replaced and updated.
Additionally, I use data snapshots to allow me to rollback the data on the NAS in the event of corrupted files or other mishaps. This allows me to roll back a volume to a previous state and backs up data at set intervals (usually weekly on Monday):

The result (48 total TB - (8 TB for RAID 5 redundancy) - (4 TB for data snapshots)) is ~36 TB of storage space available to the computers within my network. Not bad for a few movies, a couple of home videos, and some niche datasets.

There is one more disclaimer I'd like to make when it comes to using a NAS within a homelab. There is a beautiful saying from the IT world:
Two is one and one is none.
- The IT world
This means that when it comes to building an actual production system (say for a small business) it is strongly recommended to use at least 2 NAS devices that can sync with one another. That way if one NAS gets stolen, broken, or otherwise damaged then the data stored in the device remains secure.
This is one aspect where cloud platforms have a considerable advantage. Cloud platforms have redundancy built into their infrastructure so that if one of their thousands of devices fails it isn't a big deal. However the cost of hosting your data with one of these platforms will add up over time up since they charge you far more per month than it would cost to host yourself. Therefore the compromise is to store the most critical and valuable assets on the cloud and store the bulky data (videos, movies, pictures, large datasets, etc.) locally on the NAS.
Power Supplies
One of the drawbacks of running your own system is that you are responsible for maintaining the equipment if something goes wrong. This can involve a variety of different disasters, one of which could be a power outage. If the user wants to safely power down their system and initiate a shutdown procedure, it helps if there is some buffer time between the power outage and the different computers being shut down.
The final components of this setup (the un-sung heroes supporting the entire system) are my uninterruptible power supply (UPS) and a small collection of smart plugs. These components support the power requirements to run the whole system and also provide me with some additional functionality / buffer time in case things go wrong. Specifically, the UPS uses an external battery to provide continuous power to my core devices (Nighthawk, switch, AM, and MsNASty), keeping them functional and available in the event of a power interruption. This particular UPS (available here) provides up to 330 watts of power which gives me over 3 hours of continued uptime in the event of power loss.
Smart plugs are another helpful little IoT device that help me track power consumption and availability. Below we can see the power consumption of my homelab over the last 30 days (110 kWh):

They can also be used to turn different components in the homelab on or off (namely Leviathan and the rest of the homelab). Below we can see Leviathan is turned off and consuming no power:

We can easily turn Leviathan on via the UI to see that it starts consuming power:

I keep Leviathan on a separate plug so I can track its power consumption individually and so I can power it on remotely in case all nodes go offline in my cluster. In the BIOS settings I enabled wake on power restore to Leviathan, so if I ever want to turn the machine on or off all I need to do is activate or deactivate this smart plug. Then Leviathan can send WoL packets to the rest of the cluster to re-activate them. Additionally, the smart plugs I use (US-based Shelley smart plugs) have a locally accessible API that may be fun to play around with in a future emergency-protocol based project.
Homelab Use-Cases
So what do I actually do with my homelab? Good question. The main things I like to do are run locally hosted scripts and store large files.
Running Locally Hosted Scripts
The homelab allows us to run a ton of cool open source software projects 24/7 365.
Portainer
I won't get too into the weeds of Docker and containerized apps in this blog post (I still have a lot to learn there myself) but the gist of it is that Docker allows a user to make an app that can be run on a variety of different machines and operating systems. Portainer provides a nice UI to manage a variety of Dockerized apps. Below we can see a snapshot of a virtual machine (hosted by AM) that is running Portainer:

The main app I am running is called catalixiahbot. This bot couples the twitchio Twitch API with a Django App so that a Twitch streamer can collect data about their chats, subscriptions, bit redemptions, etc. There is a lightweight UI designed to dock into OBS (a popular streaming software) that queries the database for composite stats about a relevant time window. For instance if the streamer is interested in the top chatters on the 4th of July they can query the UI below:

This app needs to be up and running 24/7 so that no chat, subscription, or redemption event is missing from the database. Therefore it is a perfect example of the kind of app I want to host on my homelab. Since I want to leave this app up and running 24/7 to collect continuous streaming data, Portainer helps me monitor this app in one convenient place. This makes it easier to identify any problems that may arise with the app and helps with app maintenance.

As long as the app is up and running in this virtual machine, it remains accessible within my local network. As I design more apps that I want to use locally I can host them here on this virtual machine.
Pi-Hole
Another neat addition that I can host on a virtual machine is Pi-Hole which blocks online advertisements before they're even downloaded. Online advertisements require additional media to be rendered in your browser. This means extra data needs to be transmitted on top of the content you initially wanted to see. Pi-Hole detects and prevents these ads from downloading in the first place, reducing the overall network usage and improving overall network performance. They also provide a really cool UI that shows you statistics about your network usage:

Check it out, over a quarter of all queries to my network were blocked ads! We can also add local DNS settings so that the IP addresses don't necessarily need to be used when we want access a resource. For instance, instead of accessing the catalixiahbot UI via 192.168.1.8:1337 we can access it within the browser using catalixiah.homelab.local:1337. A bit of a longer of a name but overall more intuitive. The local DNS records can be assigned by the user in the settings/Local DNS Records panel on the left of the PI-Hole UI (shown below).

I've found that custom DNS records can be a little finicky. I haven't dug too deep into these systems yet (as I was more interested in figuring out how to get the homelab up and running, then remotely accessible first) but when I get the chance it might be worth tinkering with some more.
Storing Large Files
Thanks to the UI provided by the QNAP NAS, it is easy to remotely access the files in my NAS. I use this to store any pictures or videos I take from my camera, movies, books, TV shows, and computer backups. Since this storage can easily exceed a few TB of storage space, it saves me a lot of money in monthly fees. This helps to serve the primary function of my NAS which is to be a Google Drive that I have complete control over.

Additionally there are some really nice open source media displays that you can use including Plex and Jellyfin. These media displays will scan folders that include music, photos, and videos and display them (along with their associated metadata if they are well-known movies or films) in a nice looking UI which is similar to that of Netflix or Hulu.

Since all of this media is locally hosted, all of your photos, videos, and other assorted media remain secure within your network (and away from the pesky regulations of Google Drive or AWS).
There is more to say here when it comes to heavy duty storage. For instance I think if I could get PostgreSQL on the Homelab storage pool it would allow for the collection and maintenance of some more serious (TB-scale) home databases. For now it is great at holding all of the data that I may want to archive but don't access often.
Global Access
Finally, the last component to discuss is gaining global remote access to this homelab.

Elvis is the perfect little lightweight laptop, but it isn't very powerful. If Elvis could remotely control the components within this homelab then I can have all of the benefits of my own cloud platform without any of the risk of carrying around and losing or damaging an expensive device. Thankfully this was made incredibly easy through the use of OpenVPN. OpenVPN is a free and open-source Virtual Private Network (VPN) that allows the user to access their network from anywhere. Once Elvis connects to the VPN, everything that is hosted in my homelab (intranet) becomes accessible to it, just like if I were connected to the router at home. Thankfully the Nighthawk router comes in handy here and makes it easy to create credentials and activate the VPN:

OpenVPN is installed on a linux machine using:
sudo apt install openvpn -yThen, the credentials provided by the Nighthawk router are used to establish the connection to the local network where the homelab is hosted:
cd ~/Programs/openvpn
sudo chmod 600 ta.key
sudo chown root:root ta.key
sudo openvpn --config client2.conf
Now I can access all of the devices / apps on my network as if I were right at home (which I have been secretly doing this entire time).
Future Work
Any given homelab is an invitation to an infinite number of different projects. I now have the compute (and the infrastructure) to host some serious local apps, APIs, and long-term scripts. In addition to this I can work on the following:
- Building a more fault-tolerant homelab
- Establishing an emergency shutdown procedure throughout the network (i.e using Smart Plugs to track when power outages occur, then using that signal to trigger a response by the homelab)
- Auto-migrating virtual machines using proxmox so that some VMs become highly available in case one of the nodes die
- Enforcing tighter network security
- Charting / tracking detailed network traffic logs
- Establishing a more robust system of VLANs
- Outlining potential points of failure / getting more into homelab security
- Experimenting with different networking properties
- Playing around with network communications between machines (i.e simulating high frequency trading systems, attempting a cluster compute job across machines, testing different linux distributions, etc.)
- Self-hosting and publishing internet apps general
- Using these compute resources to host DIMMiN (though this may cause conflicts with my ISP)
- Hosting additional open source software in my homelab (vaultwarden, RSS feeds, etc.)
- Upgrading VPN from OpenVPN to Wireguard (which I tried a couple of times using proxmox VMs but ultimately went with OpenVPN which is much slower but easier to use on my network)
- Upgrading equipment when necessary (production-grade server racks will often go on sale for bargain prices if you don't mind noisy fans and heavy power consumption).
And this is just the start of the list. I have a few more things I need to square away before I start diving deeper into heavier compute jobs (mainly blog posts that have been on the backburner) but I'm hoping that I can really lean into this system at the start of November or December of this year.
Conclusion
Putting together a homelab has been a ton of fun! Of course there is still a lot to learn when it comes to networking, security, and establishing long-term fault-tolerant systems. I now have plenty of compute and dedicated power for all of the computer science simulation ideas I can come up with. Additionally, the implementation of the VPN means that I can access this system from anywhere in the world. That's exactly what I'm doing right now as I access these resources thousands of miles away from Las Vegas. But being far from my homelab doesn't bother me too much. After all, homelab is where the heart is.


Spending Way Too Much Time at Bars - My First Ultralearning Project
Sept. 4, 2022, 2:39 a.m.
I Applied to 471 Jobs so You Only Have to Apply to 470
Sept. 4, 2022, 2:35 a.m.
0 Comments
No comments yet. Be the first to comment!
Leave a Comment